Showing posts with label Bushido. Show all posts

Friday, August 1, 2014

Bushido game

Took a game with a friend today. Long time since last time, but it went quite smooth and with some minor skill and rules lookups.
If I had to choose just one game, this would be it as there is so much depth and stuff to do.

Wednesday, July 23, 2014

Bushido Buddha

I found this small Buddha statue in a home pimping store, and decided it was meant for something bigger than spending its life on a shelf unpainted. Instead it will spend it on a shelf painted. :)
Anyway, it will be nice as an objective or terrain piece for bushido.

Thursday, June 12, 2014

Bushido Savage Wave

I got me some models to paint just because I like them, and this is a little wip of the work!


Posted via Blogaway

Sunday, June 1, 2014

Bushido demons!

There has been a long while again. Work, life and more work has kept me from the brushes.
But! I took a spontaneous trip to LinCon this friday and got the inspiration flowing again.
Amongst a lot of other stuff (you will see that in another post) I found an army of three Oni demons for bushido! I choose the models only because their look as that will get me painting again.


Posted via Blogaway

Friday, December 6, 2013

Eiji the Samurai pt. 5

After the wash I highlighted him with a wetblending method using a wet palette. I have done better faces but the intention here is to make a decent model quick. :)
One session per tutorial of about 15-25 minutes each, I call that fast painting with a good result. :)

Published with Blogger-droid v2.0.10

Friday, November 29, 2013

Eiji the Samurai pt. 4

After washing.

Published with Blogger-droid v2.0.10

Thursday, November 28, 2013

Eiji the Samurai pt. 3

A bit of block painting before the big wash..

Published with Blogger-droid v2.0.10

Thursday, November 21, 2013

Bushido board pt 8

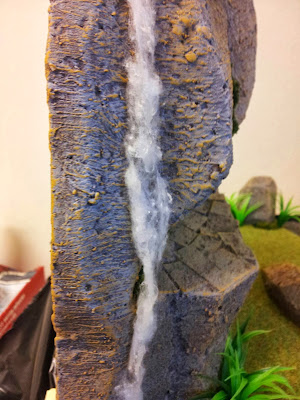
The waterfall is taking shape, I started with a thin string of cotton, and some small drops of superglue. Then some more cotton, and a lot more superglue, to finish this stage I poured the last of Vallejos still water over the fall, to give the glossy, wet look. When I get more of the modeling water I will add a bit more to the fall as well as fluff up the foamy blob at the bottom.
An idéa that worked quite well so far!

Published with Blogger-droid v2.0.10

Wednesday, November 20, 2013

Bushido board pt 7

I made some fishes in green stuff, painted and placed them on the bottom with a little superglue. Now I just have to pour some still water over them and hope it stays still this time.

Published with Blogger-droid v2.0.10

Tuesday, November 19, 2013

Busido board pt 6, the DISASTER


So, here is the story of an epic hobby failure. It was a long time since I made a stupid mistake like this, not counting splashing superglue everywhere on your hands and tools. There is a reason I didn't post anything regarding adding tracks to my t-34 last night. Let mistakes, common or not, be a reminder to think a bit more next time there is something that can possibly go wrong..

Anyhow, I use Still Water from Vallejo, as I think it is the best product and with the best clear result for a still water.

 This is the intended result, with the water stop at the end, a nice piece of water, waiting to dry. Normally you should wait 24 hours between the layers, with each layer being just a millimetre or so. But since I have a very rough surface to cover, that would mean that I have a lot of different levels of the first layer wich will make the next layer not quite match up, so as I have tried this before I knew that with a few more days I can add so much water as the first layer is flat. This is good if you want to add fish for example... ;)

Now for the bad things, I have stuck the plants in the river, pressing through the bottom and as a result the water slipped past the hard mix of sand and filler.

The pillars that should hold the bridge is also pressed down, not a long way at all but you can clearly see the holes which the water went through. The problem was that apparently white styrofoam isn't waterproof as you might have imagined, I sure did. The Still Water wasn't so still after all, and after a panicked wiping and covering of the holes underneath, without tilting the whole board I carefully put the hole board on a cut up big plastic bag so the water effect would not damage anything underneath the board, this will be a permanent solution as the water effect now has glued the bag and the board tohether. Oh well, you learn something every day, no matter how sticky and messy it may be..

 Here are some fishies, waiting to harden and get painted, these will then be glued to the first layer of water, and then be covered with more water.

Monday, November 18, 2013

Bushido board pt 5

I got some fish tank plastic plants which I used a screw to press into the styrofoam, and then twist the screw back up without the plant following. This worked surprisingly well and no glue were needed and the plants are really stuck in place if you dont *want* to remove them of course.  It is looking great with all the vegetation now.
More to come!

Published with Blogger-droid v2.0.10

Sunday, November 17, 2013

Eiji the Samurai pt. 2

Step two, the Wash. I used an old ogryn flesh that has got some black, brown and sepia mixed in along with water and god knows what else.
It really doesnt matter as you just need to make the details pop.

Published with Blogger-droid v2.0.10

Friday, November 15, 2013

Eiji the Samurai


Just a first pic before I start to paint him, I intend to try to make a step by step 'how I paint my models' for some people at the club.
Published with Blogger-droid v2.0.10

Bushido board pt 4


Grass time, about now it started to look really good!
Published with Blogger-droid v2.0.10

Wednesday, November 6, 2013

Bushido board pt 3

Onwards to painting! A good base paint of brown mixed with a little grey will be a solid base to work  with.

Half-painted..

And fully painted. after it dried a bit more the tiles were a bit more visible.

There is a Bushido tournament in Gothenburg at the end of november, I have ordered another model so I can have 45 rice/points if I can find time to get there, I will also bring my table as well!

Tuesday, November 5, 2013

Bushido board pt 2

The board is getting more attention than ever.

Starting with adding filler with the best tool availible.

Give it a good rough handling and be sure to use a lot of filler to get it in every tiny gap of the foam. 

After smearing filler all over the board, I brushed everything to give it better texture than my fingers did, I did it extra rough over the tiles to get them visible again.

Then I dipped the brush in water to make the filler a little more fluid, it had gotten a bit hard since I began and also to brush the tiles again with water to make them even more visible.

I mixed in a bit of fine aquarium sand with filler and water and brushed the rivers with this.

After the messy messy filler part was done I poured fine sand over the board, especially over the rivers.

While waiting for the filler to dry I played a game of X-wing, a tight game with my opponent manouvered very good and was everywhere and avoided crashing with a few millimetres every turn. But the last two turns my ships went bananas and critically hit everything and evaded almost anything coming  their way, and the Tie's were reduced to space rubble. 
Better luck next time, Empire.

After wiping the floor/space with my opponent I shaked all excess sand of the board and waited for some paint to come it's way, more of that next time!


Monday, November 4, 2013

Bushido board pt 1

So, starting a new game is for me almost the same as building a board to go with the game. With my Bushido  models fresh from the brushworks it is time to get messy...

The board after cleaning up all the tiny white dots, a billion white little dots...

Cutting up all the tiles for the paved roads.

And the roads glued in place.

The inspiration comes from Tianmen Mountains in China, obviously this is just the inspiration.
The board will have a lot of platforms and passages for models to glare angrily at each other from.

On to the even messier part, filler!

Tuesday, October 29, 2013

Ito Clan-ish for Bushido

Yesterday I finished some old GM-4 miniaures I got as a gift from my buddy Jonas too long ago, I had some oriental project in mind but it never left the thinking phase, now with Bushido I found no reason not to use them, and as you get the cards (as well as the rules) from their homepage it was no problem to find models to replace with them.

I am happy with the result and I got a small 15rice group. (Bushidos don't have points, they have rice!)


Friday, October 25, 2013

Ryu starter finished

At long last I took some time and finally finished the models of my Bushido starter. Great models to paint with lots of details.
The game seems very nice too, and I eagerly await a chance to try them out!


Saturday, September 21, 2013

First Bushido model done!

A stout defender of the well of solitude he is about to chase away the Goblin of Screams. I really enjoyed painting this yari wielding model, great sculpt and I look forward to paint the rest of the gang. They will be painted all together now that I know that the scheme works and looks good. More to come, and maybe a little oriental inspired terrain as well!

Published with Blogger-droid v2.0.10